

Postoperative Protocol for Distal Radius Fractures
You’ve had wrist surgery. Now what? That question sits at the back of most patients’ minds the moment the anesthesia wears off, and it’s exactly what a postoperative protocol for distal radius fractures is designed to answer.
Instead of relying on guesswork when it comes to recovery, this protocol specifies exactly what your wrist requires each week, covering the initial days when it is swollen and uncomfortable, right through to the stage where you can grip a coffee mug without having to think about it.
The distal radius sits at the wrist end of the forearm and ranks among the bones people break most often, usually after bracing a fall with an outstretched hand.
Surgery puts the pieces back where they belong. What comes next, the splinting, the therapy, the follow-up scans, is often what separates a wrist that heals well from one that doesn’t quite get there. Here’s what that process actually looks like.
What is a postoperative protocol for distal radius fractures?
Think of it as a roadmap. A postoperative protocol for distal radius fractures lays out, in sequence, what needs to happen after the plates and screws are in place:
- A splint or cast is used to keep the bone stable and protect the repair.
- Managing pain is important, especially during the first few difficult days.
- Taking care of the incision as it heals is also important.
- Therapy usually starts slowly and increases in stages, rather than all at once.
- Follow-up X-rays help make sure the bone is healing as expected.
Every fracture is different. For example, a simple break fixed with one plate will heal differently than a more serious injury that needs an external fixator. However, most surgeons base their treatment plans on the same basic biology: the stages the bone goes through as it heals.
Distal radius fracture healing stages
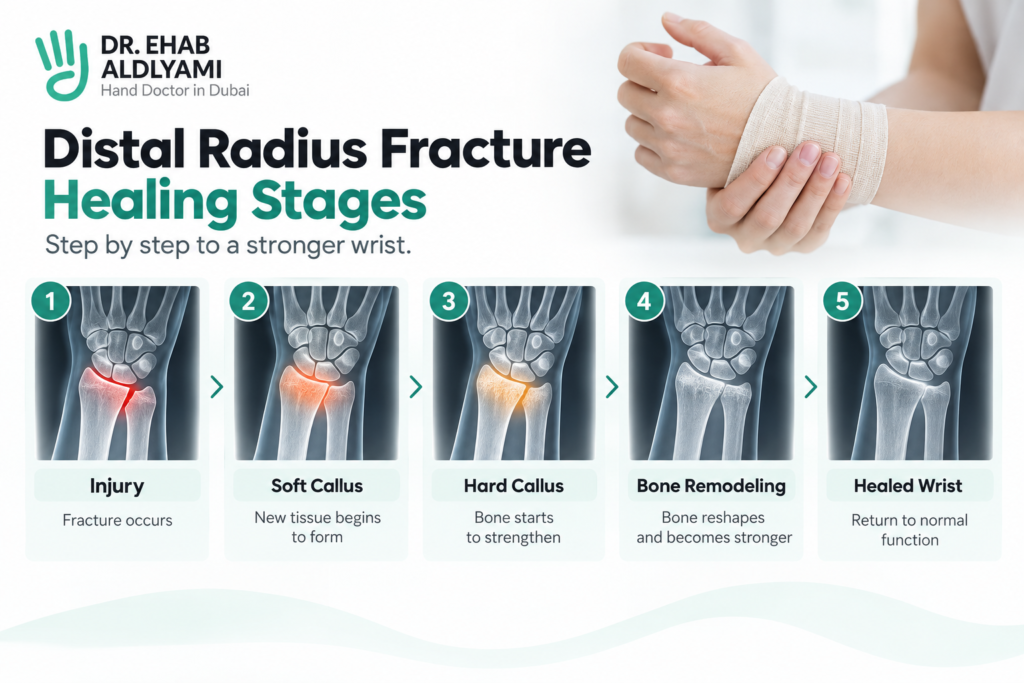
Bones don’t heal overnight, and they don’t heal in one continuous sweep either. The distal radius fracture healing stages unfold in layers, each one setting up the next. Knowing where you are in this sequence makes the slow parts easier to sit through.
Weeks 1 to 2: the inflammatory stage The body’s first move is to clot blood around the break and send in cells to clear out debris. This is the stage where swelling and bruising peak, and honestly, where recovery can feel the least like progress even though a lot is happening beneath the surface. | Weeks 2 to 6: the soft callus stage A cartilage-like bridge starts forming between the broken ends. It’s soft, it’s not load-bearing yet, and that’s precisely why the cast or splint stays on and heavy hand use is off the table. |
Weeks 6 to 12: the hard callus stage The soft bridge hardens into actual bone. X-rays taken during this window usually show visibly denser tissue at the fracture line, which is often the cue surgeons wait for before loosening restrictions and green-lighting more structured therapy. | Months 3 and beyond: remodeling The bone keeps quietly reshaping itself along the lines of everyday stress, inching back toward its original strength. This last stretch of the distal radius fracture healing stages can run well past the point where your wrist already feels back to normal. |
Distal radius fracture recovery time: What to expect
Ask five surgeons about distal radius fracture recovery time and you’ll get five slightly different answers, because it hinges on how severe the break was, how it was fixed, your age, and your general health. That said, a rough timeline tends to hold:
- Weeks 1 to 2: elevation, rest, swelling control; fingers and shoulder kept moving to avoid stiffness elsewhere.
- Weeks 2 to 6: splint or cast still on, gentle guided movement introduced..
- Weeks 6 to 12: strengthening begins as the hard callus sets in, light daily tasks slowly return.
- Months 3 to 6: most people are using the wrist functionally, even if full strength lags behind.
- Up to a year or more: the last bit of distal radius fracture recovery time, fine motor precision, any lingering stiffness, tends to trail well past the fracture itself.
The temptation to rush is understandable, but pushing the wrist before it’s ready is one of the more common ways recovery gets derailed.
Complications after distal radius fracture surgery
Not every recovery is smooth, even under good care. Being aware of possible complications after distal radius fracture surgery means you’ll notice a problem sooner rather than later:
- Ongoing stiffness in the wrist or fingers
- Numbness or tingling in a nerve, often the median nerve, gets irritated
- Discomfort around the plate or screws
- Malunion or a slower-than-expected union, where the bone settles crooked or just takes its time
- Complex regional pain syndrome, an uncommon but real possibility involving lingering pain and heightened sensitivity
- Infection at the incision site
Follow-up visits exist for exactly this reason. They’re how a surgeon catches complications after distal radius fracture surgery while they’re still manageable, rather than after they’ve become a bigger problem.
What about the distal radius fracture surgery scar?
Scarring is one of those things patients don’t ask about at first, then bring up in every follow-up visit once the cast comes off. Fair enough.
- Most incisions run along the palm side of the wrist (the volar approach), which tends to fade less noticeably than a scar on the back of the hand.
- Early on, expect it to look pink, raised, maybe a little tight or firm.
- Give it a few months and most surgical scars soften and flatten as the skin remodels itself.
- Once the incision has fully closed, gentle massage and keeping the area out of direct sun both help the distal radius fracture surgery scar fade more evenly.
A few things that genuinely help recovery
- Keep the hand propped above heart level, particularly in week one, to keep swelling down.
- Wiggle your fingers and rotate your shoulder daily so nearby joints don’t stiffen up out of neglect.
- Stick to the splint or cast schedule your surgeon gave you, even on the days it feels unnecessary.
- Show up for physical therapy consistently once you’re cleared to start.
- Hold off on lifting or gripping anything heavy until you get the go-ahead.
- Keep the surgical site clean and dry per instructions to keep infection risk low.
Trust Dr. Ehab Aldlyami's 25+ years of hand and wrist expertise
A good outcome after a distal radius fracture rests on two things: careful surgery and a postoperative protocol for distal radius fractures that’s actually followed through.
Dr. Ehab Bassim Aldlyami has spent over 25 years focused on hand and wrist surgery, with advanced training from the Pulvertaft Hand Centre in the UK backing every step of the recovery plans he builds with patients.
His work with Complex Hand & Wrist Trauma, paired with fluency in English and Arabic, means patients stay informed in whichever language puts them at ease.
FAQs
From person to person, most patients achieve functional use of the wrist within three to six months; full strength and fine motor control generally take about a year to return completely. Following each stage of the postoperative protocol for distal radius fractures, including therapy, makes the timeline seem more steady and foreseeable rather than being delayed.
There are four: an inflammatory phase in the first couple of weeks, a soft callus phase from around week two to six, a hard callus phase from week six to twelve, and a remodeling phase that stretches on for months afterward. Each one marks a different point in the bone’s natural repair, and each guides how much activity is safe at that time.
Most people heal without major setbacks, but stiffness, nerve irritation, hardware discomfort, delayed healing, or infection can happen. Keeping up with follow-up appointments gives your surgeon the chance to spot and address any of these early, which usually keeps a minor issue from turning into a bigger one.
Usually not dramatically so. It follows the palm-side incision, which fades more discreetly than one on the back of the wrist. Expect it to look pink or slightly firm for the first several weeks, then gradually soften and blend into the surrounding skin as everything heals over the following months.